


Full Bust Adjustment (FBA): Step-by-Step Sewing Guide
Pattern fitting · Complete guide with diagrams
A top that fits beautifully over a fuller bust
Your top pulls across the bust, gapes at the neckline or rides up at the front. The button placket may gape and diagonal drag lines can run towards the armholes. That does not automatically mean you need a larger size. If the shoulders and upper body fit but the bust needs more room, a Full Bust Adjustment, or FBA, can add width and length exactly where you need it while preserving the fit elsewhere.
Many sewists avoid fitted patterns because the bust measurement pushes them into a size that is too large through the shoulders and neckline. Many sewing patterns are drafted for a specific base cup size, often B or C, although this varies by pattern company. The key is to check the pattern’s cup sizing, choose the size that best fits your upper body, then add the extra room required at the bust.
Quick answer
For this classic FBA method, choose the pattern size that best matches your upper bust, compare your full bust with the cup difference built into the pattern, then divide the required extra room by 2 because you are altering a half-front pattern piece. Draw three cutting lines that meet at the bust point, spread the pattern, add the required front length, then redraw and true the darts and seams.
In this guide
▼ Before you start
What is a Full Bust Adjustment (FBA)?
An FBA is a pattern adjustment that adds width and length to the front of a garment pattern at bust level. Its purpose is to create more room over the bust without unnecessarily enlarging the shoulders, neckline or back.
Simply going up a size may give you enough room at the bust, but it can also make the shoulders, neckline and armholes too large. An FBA is useful when the upper body fits in a smaller size but the front needs additional bust volume.
Signs you need an FBA
- Diagonal drag lines running from the bust towards the armpits.
- Front hem riding up higher than the back hem.
- Buttonholes gaping between the breasts.
- Shoulders and neckline too wide when the bust fits.
- Dart points in the wrong place, above or beside the bust.
Good to know: Once you know the FBA amount that works well for you, it becomes a useful starting point for other patterns drafted for a similar base cup. The exact adjustment can still vary with the pattern’s ease, design and shaping, so check each new pattern and make a toile when needed.
▼ Step 1
How to measure and calculate your FBA
Everything starts with two measurements, taken in your usual bra, with the tape measure level and not pulled tight. If you’re unsure, our guide on how to take your measurements shows each point in detail.
- Upper bust: under the arms, above the bust, high across the back.
- Full bust: around the fullest part of the bust.
Choose the right size
As a starting point, choose the size that best matches your upper bust and upper body rather than sizing only from the full bust. This usually gives a better fit through the shoulders, neckline and armholes. If the size guide does not list an upper bust measurement, check the brand’s stated base cup and sizing instructions before calculating your adjustment.
Work out the difference
For this method, calculate the bust difference:
Difference = full bust − upper bust.
| Difference | Approximate sewing cup difference |
|---|---|
| 2.5 cm (1″) | A |
| 5 cm (2″) | B |
| 7.5 cm (3″) | C |
| 10 cm (4″) | D |
| 12.5 cm (5″) | DD / E |
| 15 cm (6″) | F |
Work out the amount to spread
Subtract the bust difference the pattern is drafted for (for example, 5 cm for a B sewing cup or 7.5 cm for a C sewing cup, if that is the system used by the brand). Always check the pattern instructions. Because the pattern piece is only half the front, divide the extra amount required by 2.
Example: upper bust 88 cm, full bust 98 cm, pattern drafted for a B cup.
- Difference: 98 − 88 = 10 cm (D cup).
- Total adjustment: 10 − 5 = 5 cm.
- Amount to spread on the half front: 5 ÷ 2 = 2.5 cm.
Before you alter the pattern: If the calculated amount is very small, you may not need a full adjustment. Check the intended ease and make a toile first.
▼ Step 2
Prepare the pattern
Work on a copy of the pattern whenever possible so you can return to the original if you need to change the adjustment.
| What you need | Why |
|---|---|
| Tracing paper or tissue paper | To trace the front and fill in the gaps |
| Clear ruler and French curve | To draw straight lines and smooth curves |
| Pencil and two coloured pens | To tell cutting lines from new lines |
| Paper scissors | To keep your fabric scissors sharp |
| Matte tape | To hold the pieces; you can write on it |
| Inexpensive fabric (calico, old sheet) | To test the fit before your good fabric |
- Trace the front in your upper bust size. Remove the seam allowances if they’re included: it’s far more accurate without them.
- Extend the grainline along the full length of the piece.
- Mark the bust point (the apex). Measure from your shoulder to your apex, and half the distance between your two apexes, then transfer these measurements to the pattern.
- Check the darts: their points will usually stop short of the bust point rather than ending directly on it. Around 2 to 2.5 cm is a useful starting point, but the ideal distance depends on bust shape, fabric and dart width. If the bust point is in the wrong place, correct it now.
- Mark the armhole: make a mark about a third of the way up from the bottom of the armhole, often at the front notch.
Remember: An FBA built on a misplaced bust point moves the problem instead of fixing it. Take the time to find it accurately.
▼ Step 3
Draw the cutting lines
This is the classic slash-and-spread “Y” method for a front with a side bust dart and, if present, a waist dart. The three cutting lines are organised around the bust point.
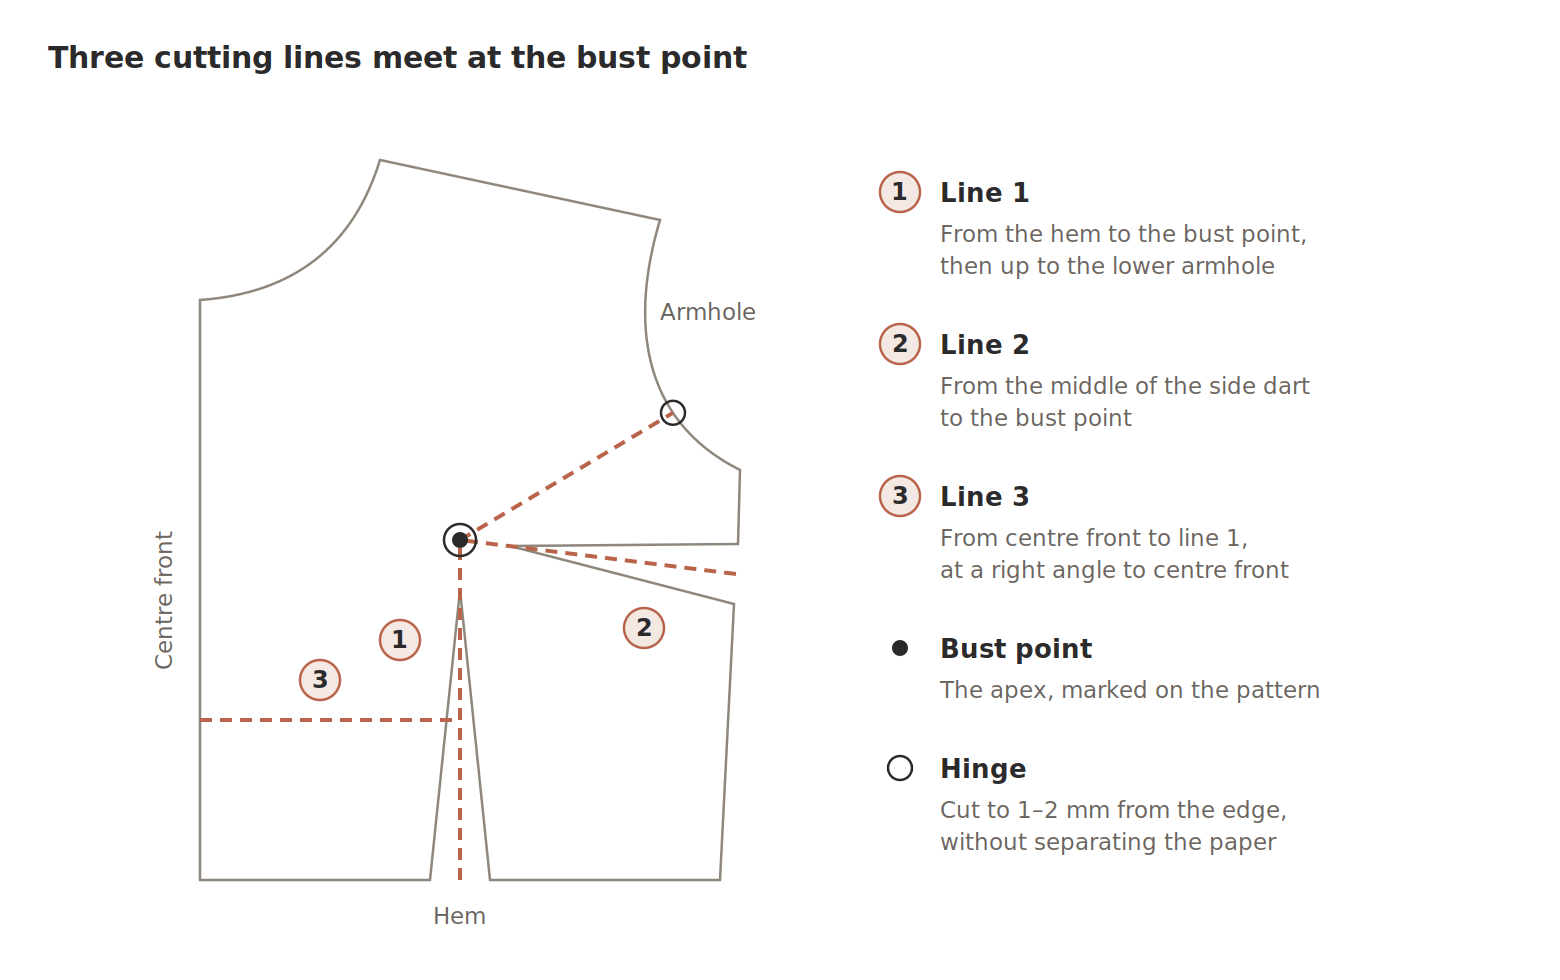
Line 1 runs from the hem to the bust point, then up to the armhole; line 2 starts at the side dart; line 3 crosses the centre front below the bust.
- Line 1: draw a line from the lower edge, parallel to the grainline and through the centre of the waist dart if there is one, up to the bust point. Continue it at an angle to the mark on the lower third of the armhole.
- Line 2: draw a line from the side seam, through the middle of the side dart, to the bust point.
- Line 3: draw a line at a right angle to the centre front, across to line 1, roughly level with the middle of the waist dart.
▼ Step 4
Cut and spread the pattern
This is where the extra room appears. In this example, we spread by 2.5 cm.
- Cut line 1 from the hem to the bust point, then on to the armhole. Stop 1–2 mm from the edge to leave a hinge.
- Cut line 2 from the side seam to the bust point, leaving a 1–2 mm hinge. The side section can now pivot.
- Spread: place the pattern on paper and slide the side section outwards until the edges of line 1 are 2.5 cm apart and parallel at the bust point. Tape in place.
- Cut line 3 and move the lower centre front section down until its hem lines up with the side section. Keep the centre front straight and tape in place.
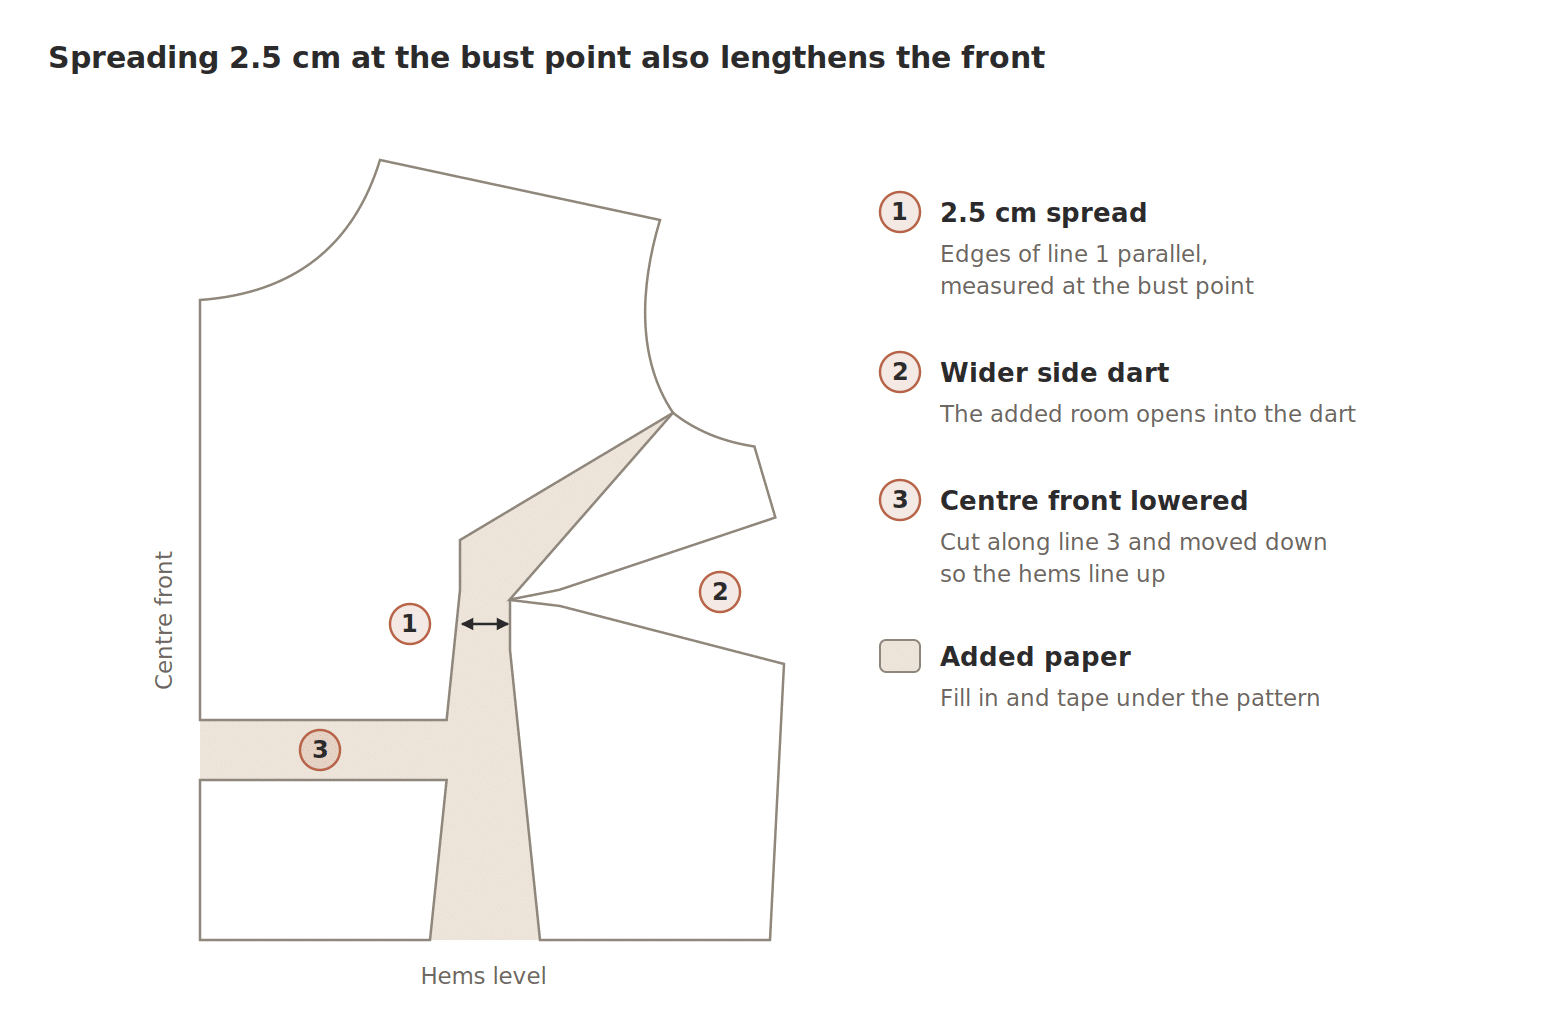
The side section pivots on the armhole hinge: the side dart opens and the centre front drops to meet the hem.
This is normal: The side dart becomes much wider and the side section sits lower than the centre front. That’s exactly the length your bust needs.
▼ Step 5
Redraw the darts and seams
The paper is spread: now the darts need their new shape.
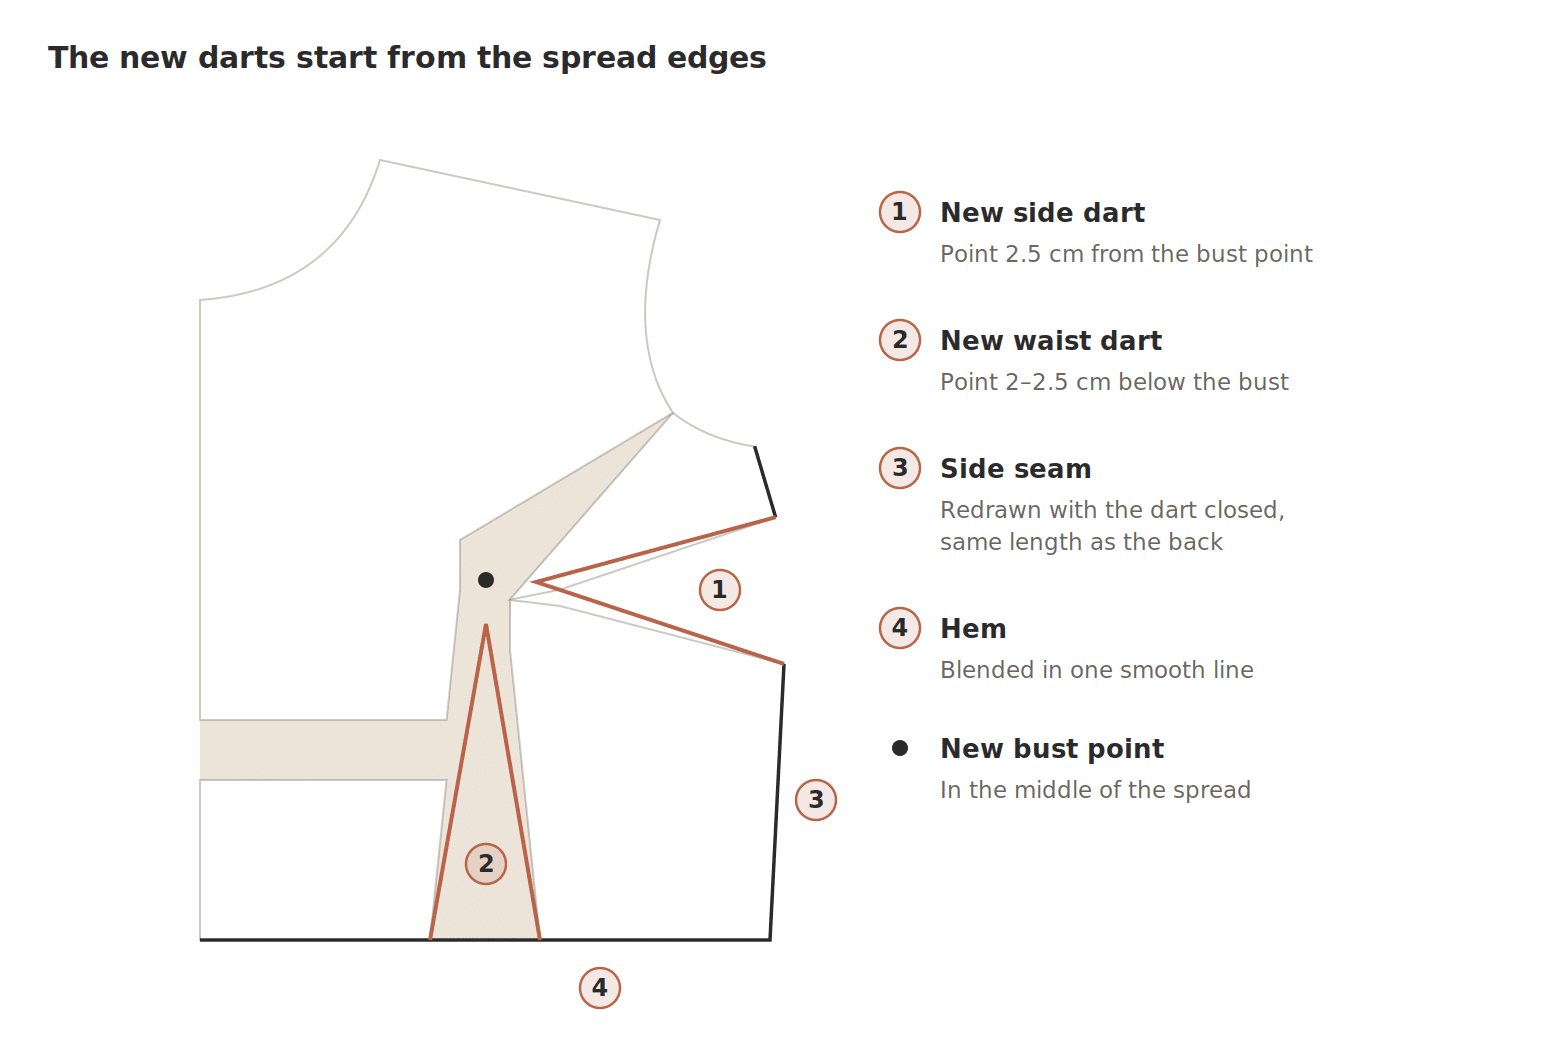
Both darts widen to absorb the spread, and their points aim at the new bust point, in the middle of the spread.
- Side dart: draw the centre of the new dart, place its point 2.5 cm from the bust point and join it to the two new ends on the side seam.
- Waist dart: place the new point 2–2.5 cm below the bust point, in the centre of the spread, and join it to the two edges of the dart at the hem.
- Side seam: fold the side dart closed as if it were sewn, pressed downwards, and redraw the seam in a straight line. Cut the paper with the dart closed to get the right dart shape.
- Hem and armhole: blend them into one smooth line. Check that the front side seam is the same length as the back, with the darts closed.
- Seam allowances: add them back, transfer the notches and grainline, and write “FBA 2.5 cm” and the date on the pattern.
Tip: Keep the adjusted pattern and write the final FBA amount on it. That measurement gives you a useful reference for future patterns, but recheck the base cup, ease and design before applying it unchanged.
▼ Variations
FBA on dartless patterns, princess seams and knits
The same fitting principle can be adapted to many pattern styles, but the cutting and spreading method changes with the construction. Here are the most common cases.
Dartless pattern (woven fabric)
Do the FBA exactly as above: a side dart appears at Step 4. Then you have three options:
- Keep the dart: the cleanest solution for a woven fabric.
- Pivot it to the neckline, shoulder or hem, and turn it into gathers or pleats.
- Ease it into the side seam, only if it’s 1.5 cm or less.
Detailed tutorial: For step-by-step diagrams and three ways to handle the new bust dart, see our FBA on a Pattern Without Darts guide.
Princess seams
Here, the extra room goes into the side front piece, not into a dart.
- On the side front piece, mark the bust point on the curve.
- Draw a horizontal line from the bust point to the side seam, and a vertical line from the bust point to the hem.
- Cut and spread horizontally by your amount at the bust, and slightly vertically to lengthen the curve.
- Lengthen the centre front piece by the same amount, at bust level.
- Blend the curve and check that both edges are the same length, notches included.
Knit and stretch fabrics
Stretch fabrics behave differently from wovens because stretch percentage and negative or positive ease affect how much extra bust room is needed. For a small discrepancy, you may need less width than you would in a woven pattern, but there is no single cut-off that works for every knit. Check the fabric stretch, the pattern’s intended ease and a toile before deciding.
| Difference | Solution |
|---|---|
| Small adjustment | Depending on stretch and ease, you may only need extra front length or a small amount of additional width. Test the fit before altering further. |
| Larger adjustment | Use a knit-appropriate FBA or adapt the classic method, then manage the added fullness with a small dart, gathers or another design feature if the pattern allows it. |
To sew your knit top afterwards, follow our guide on how to sew knit fabric without a serger.
Large FBA
When a large amount is added to a half-front, one side dart can become very wide and difficult to shape smoothly. Consider dividing the fullness between two darts, rotating some of it elsewhere, or using a pattern with princess seams. A toile is especially important for a larger adjustment.
▼ Step 6
Make a toile and try it on
A toile saves you time and good fabric. Cut only the front and back bodice, with no sleeves or finishes, and baste with long stitches.
When you try it on, check in this order:
- The centre front hangs straight down.
- The side seams are vertical and don’t swing forwards.
- The hem is level, front and back.
- No more drag lines run from the bust towards the armpits.
- The dart points stop just before the fullest part of the bust.
- The centre front doesn’t gape between the buttons.
To fine-tune: A horizontal fold below the bust means too much length: pin out the excess on the toile and transfer it to the pattern. If the fabric still pulls, add 0.5 cm to the spread and try again.
▼ Troubleshooting
Common problems when doing an FBA
| Problem | Solution |
|---|---|
| Shoulders and neckline too wide | The size was chosen by the full bust. Use your upper bust size instead. |
| Front far too wide | The amount wasn’t divided by 2. The pattern piece is half the front. |
| Stepped front hem, top rides up at the centre | The centre front wasn’t lengthened. Cut line 3 and line up the hems. |
| Dart points above or beside the bust | The bust point is misplaced. Measure on your body and correct it before drawing. |
| Pointy look at the end of the darts | The darts are too long. Stop them 2–2.5 cm from the bust point. |
| Distorted armhole | The hinge was cut through. Tape the pieces back in place. |
| Facing or lining no longer matches | Repeat the FBA on the lining and adjust the facing at centre front. |
| Side seams don’t match | Check the side seam length with the darts closed and blend the hem. |
▼ Your first FBA
A realistic route into fitting your bust
- Start with a simple top with a side dart: few pieces, no collar or tricky sleeves. Browse our tops and blouses patterns.
- Do the FBA on a copy, then make a toile of the bodice only.
- Write your final amount on the pattern: it will give you a useful starting point for future patterns with a similar base cup.
- When you feel confident, move on to a fitted dress or a princess-seam design from our dress patterns.
- Then try the variations: a dartless woven top, then a knit.
Your first FBA can feel technical because you are changing the structure of a pattern. After a few garments, the sequence becomes much more familiar: locate the bust point, draw the cutting lines, spread the pattern, add the required length, then true the darts and seams. A careful toile will tell you whether the adjustment is right for that particular design.
Frequently asked questions about the FBA
What is an FBA in sewing?
An FBA (Full Bust Adjustment) is a pattern adjustment that adds width and length to the front, only at the bust, for busts fuller than the cup size the pattern is drafted for.
How do I know if I need an FBA?
If your full-bust-to-upper-bust difference is greater than the difference built into the pattern, and the shoulders fit while the bust feels tight or creates drag lines, an FBA is likely to improve the fit. Check the pattern company’s cup system and confirm the result with a toile.
Do I need to adjust the back too?
The FBA itself is made on the front. The back does not need the same bust adjustment, although you may still need separate back or shoulder alterations depending on your fit.
Does an FBA change the sleeve?
Usually very little if the armhole hinge is handled correctly. After the alteration, walk or measure the armhole seam and compare it with the sleeve cap before cutting your fabric.
Can I do an FBA on a dartless pattern?
Yes. A slash-and-spread FBA can create a side dart on a dartless woven pattern. You can keep it, rotate it into another location, or convert the added fullness into a suitable design feature such as gathers or pleats.
Can I do an FBA on knit fabric?
Yes, but the amount and method depend on the fabric’s stretch and the pattern’s intended ease. A small adjustment may require only limited extra length or width; a larger adjustment may need a knit-specific FBA or a carefully adapted slash-and-spread method.
What is the difference between an FBA and an SBA?
An SBA (Small Bust Adjustment) is the opposite: you overlap the pieces instead of spreading them, to remove room for a smaller bust.