
Stop Guessing Your Size: How to Measure Yourself for Sewing Patterns
You just found the perfect sewing pattern. You’re excited, you order it — and then the finished garment doesn’t fit right. Sound familiar? The problem is almost never the pattern. It’s the measurements.
Taking your body measurements correctly is the single most important skill you can develop as a home sewer. It takes less than 10 minutes, but it will save you hours of frustration and wasted fabric.
⚠️ The Most Important Step Before Choosing Your Size
Taking your body measurements is only half the job. The most important step is to always compare your measurements to the garment measurements listed in the sewing instructions — not just the size label.
Every pattern includes finished garment measurements that already account for ease (the extra room built in for movement and comfort). A size M in one pattern may have completely different finished dimensions than a size M in another. Always read the instructions first, compare both sets of numbers, then choose your size. This one habit will transform your sewing results.
In this guide, I’ll walk you through every body measurement you need — step by step — plus our full size chart and international conversion table so you can order with total confidence.
🧵 What You’ll Need
- A soft measuring tape (sewing tape, not a metal one)
- A mirror — or better yet, a friend to help
- Form-fitting clothing or just your underwear
- A pen and paper to note everything down
💡 Always measure over the underwear or clothes you’ll wear under the finished garment — never over bulky layers.
📐 The 7 Essential Measurements
Take each one carefully — and write them down as you go.
1. Bust
Wrap the tape around the fullest part of your chest, keeping it parallel to the floor. It should be snug but not tight — you should be able to slide two fingers underneath.
👗 Used for: bodices, dresses, tops, jackets — the most critical measurement of all.
2. Waist
Find your natural waist — the narrowest part of your torso, about an inch above your belly button. Bend sideways: the crease that forms is your natural waist. Wrap the tape around it comfortably.
👗 Used for: skirts, trousers, dresses, any garment with a defined waistline.
3. Hips
Stand with feet together. Measure around the fullest part of your hips and bottom, keeping the tape parallel to the floor — usually 18–23 cm (7–9 inches) below your natural waist.
👗 Used for: skirts, trousers, fitted dresses. Getting this wrong is the #1 cause of pulling fabric.
4. Back Length (Nape to Waist)
Ask a friend to measure from the prominent bone at the base of your neck (nape) straight down to your natural waist. Stand tall and look forward while they measure.
👗 Used for: bodices and tops — determines where the waist seam will fall on your body.
5. Shoulder Width
Measure across the back from the edge of one shoulder to the other. The endpoints are where your shoulder meets your arm — you’ll feel a slight dip at that joint.
👗 Used for: tops and jackets. Shoulder seams that slip off or pinch are a sure sign this wasn’t measured right.
6. Sleeve Length
Bend your arm slightly. Measure from the top of your shoulder, over the elbow, down to your wrist bone. Always measure with a bent arm — this allows for natural movement.
👗 Used for: any sleeved garment. Easy to get right once you know how!
7. Inseam (for Trousers)
Measure from your crotch down the inside of your leg to your ankle bone. The easiest method: measure a pair of trousers that already fit you well, along the inner leg seam.
👗 Used for: trousers and shorts only — but essential when it is needed.
📋 Reminder: Always Cross-Check with the Pattern!
Once you have your measurements, open your sewing instructions and find the garment measurements table. Compare your body measurements to the garment measurements for each size. The right size is the one where the garment measurements give you the right amount of ease — not necessarily the size that matches your body measurements exactly.
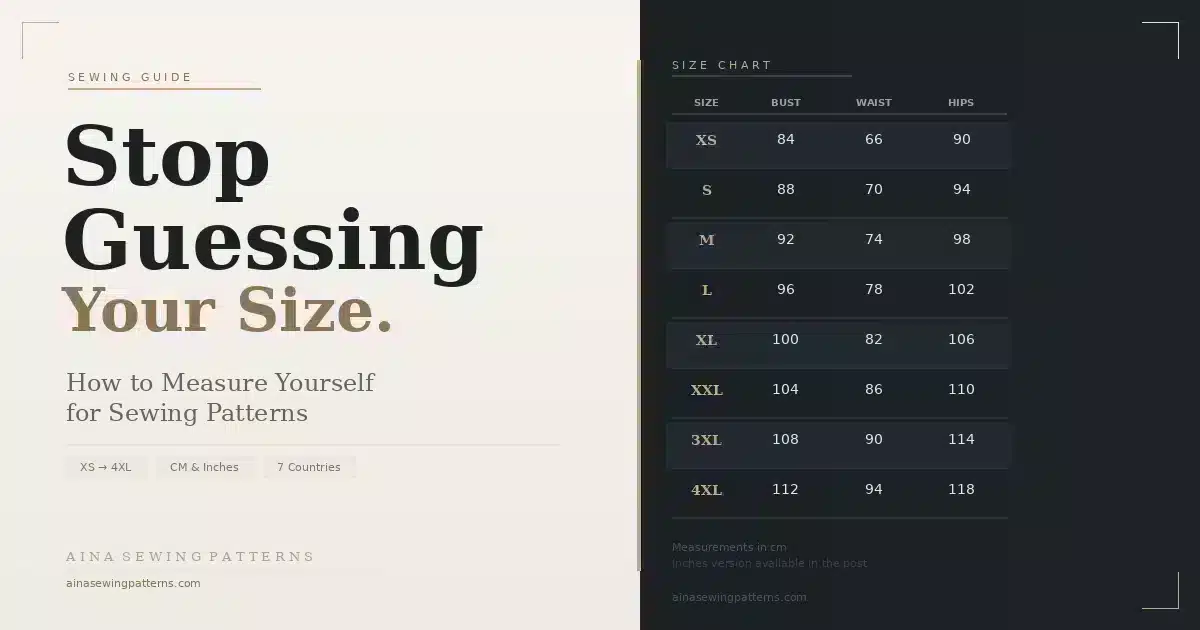
📏 AinaSewingPatterns — Size Chart (CM)
Always choose your size based on your largest measurement, then adjust from there.
📏 AinaSewingPatterns — Size Chart (Inches)
Same sizes, in inches for our US, UK, and Australian customers.
| Size | Bust | Waist | Hips |
|---|---|---|---|
| XS | 33″ | 26″ | 35.4″ |
| S | 34.6″ | 27.5″ | 37″ |
| M | 36.2″ | 29.1″ | 38.6″ |
| L | 37.8″ | 30.7″ | 40.1″ |
| XL | 39.4″ | 32.3″ | 41.7″ |
| XXL | 41″ | 33.8″ | 43.3″ |
| XXXL | 42.6″ | 35.4″ | 44.9″ |
| 4XL | 44.2″ | 37″ | 46.5″ |
🌍 International Size Conversion
Find your local size equivalent across 7 countries.
| Country | XS | S | M | L | XL | XXL | XXXL | 4XL |
|---|---|---|---|---|---|---|---|---|
| 🇫🇷 France / Europe | 34 | 36 | 38 | 40 | 42 | 44 | 46 | 48 |
| 🇺🇸 USA | 2 | 4 | 6 | 8 | 10 | 12 | 14 | 16 |
| 🇦🇺 Australia | 6 | 8 | 10 | 12 | 14 | 16 | 18 | 20 |
| 🇬🇧 United Kingdom | 6 | 8 | 10 | 12 | 14 | 16 | 18 | 20 |
| 🇯🇵 Japan | 5 | 7 | 9 | 11 | 13 | 15 | 17 | 19 |
| 🇷🇺 Russia | 40 | 42 | 44 | 46 | 48 | 50 | 52 | 54 |
| 🇮🇹 Italy | 38 | 40 | 42 | 44 | 46 | 48 | 50 | 52 |
✨ 5 Pro Tips for Perfect Measurements
- Stand naturally — don’t hold your breath or pull your shoulders back. You’ll wear this garment while breathing normally!
- Keep the tape parallel to the floor for bust and hip measurements. A slight dip can cost you a centimeter or more.
- Measure twice, cut once — 30 extra seconds now can save hours of frustration later.
- Keep a measurements card and update it every 6–12 months. Bodies change — and that’s perfectly normal!
- Between two sizes? Always go larger — it’s much easier to take in a seam than to let one out.
Ready to sew?
Find Your Perfect Pattern 🧵
All AinaSewingPatterns PDF patterns include a full size chart (XS to 4XL), garment measurements, and step-by-step instructions — everything you need to sew with confidence.
Final Thoughts
Good fit starts with good measurements — and good measurements start with understanding not just your body, but also the garment you’re making. Take the time to compare both, and you’ll be amazed at how much better your finished makes turn out.